![]()
Note: All information is based upon Windows operating system and Lightroom 2.3

Now that you have applied keywords all of your photos in Lightroom it’s time to learn to use the keywords to find your photos. As with most things in Lightroom there is more than one way to search with keywords. In this lesson you will learn to search with a single keyword from the keyword list. You will learn to use the library filter to search for all photos matching a single keyword, photos matching multiple keywords, and photos that match all of multiple keywords.
Find photos with the keyword list
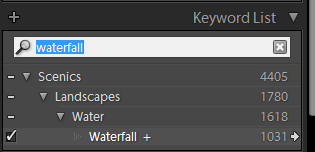
To find photos using the keyword list you can drill down to the desired keyword, or use the “Filter Keywords” box to find the desired keyword.

Click on the arrow to the right of the photo count and the library will display all photos keyworded with “waterfall”.

This method is quick and easy if we only want to find photos with one keyword, but what it we want to find photos by using multiple keywords?
Library Filter
The Library Filter is a very powerfull tool in Lightroom for finding and sorting your photos using just about anything in the database other than your develop settings. The problem with the Library Filter is that Adobe did a fairly good job of hiding it and it’s functionality. In this lesson we are only going to look at finding photos using Keywords, but as you will see looking at the Library Filter there is much more you can do and it all functions in the same way.
To get to the Library Filter (you must be in the library module) go to the menu bar and click “Library” then “Find” or use “Ctrl + F” or just hit the “\” key and this will open the Library Filter as shown below.
![]()
You will see four options in the center which will be grey other than “None” (this means that None is what is active). For our purpose we will select “Metadata” by clicking on it.

You will now see four columns with “Date”, ” Camera”, “Lens”, and “Label” (This is the default assuming you have not changed the layout).
At this point it appears that these are the only methods that you have to sort and would seem fairly useless to finding a photo of a waterfall, which is what we want to do. Fortunately there is more here than meets the eye.

Move your cursor over the “Date” heading in the first column and it will turn white and a double headed arrow will appear. Click on the double arrow and you will get the following dropdown list.

In this list you will see “Keyword” as one of the choices, click on keyword and you will get a copy of your Keyword list in the first column.

On the right side of the column header you will see another little symbol indicating another drop down box and when you point to it with your curser will get a dropdown arrow, click the arrow and you will see the following.

Be sure that the Hierarchical has a checkmark next to it. If it does not click on the word “Hierarchical” to toggle it on (if the check is there and you click, it will turn off).
Note: Important – Be sure that you have selected “All Photographs” in the Catalog panal (if you want to search all of your photos). If you have a large Catalog with many thousands of images Lightroom can be very slow to respond when doing searches. However it is still much faste than I can find them manually.
You should now see a miniture version of your Hierarchical Keyword List that you have been using to tag your photos.

Now you can scroll down and expand to find the keyword you want to filter on and the click the keyword. Be sure that on the other columns that you are not using that you have all selected at the top of the column. You can now see all the “Waterfall” photos in the library window.
Let’s take it a step further and say we want to find all our “Waterfall” photos but also photos of “Creeks & Rivers”

Hold down the Ctrl Key and click on the “Creeks and Rivers” keyword in the same column and we will now see all photos that have either the “Waterfall” keyword or the “Creeks & Rivers” keyword. You can select additional keywords by simply holding the Ctrl key and clicking on the additional keywords you wish to add to the search.
Now we want to find only photos of “Waterfall” but we want to narrow it to photos taken in “Arkansas”. Go to the second column in the Library Filter and click on the column header which is “Camera” in our example and click to get the dropdown list and again choose “Keyword”. You will now have two columns with the “Keyword” heading. In the second column we choose the keyword “Arkansas”.

You can see that I have 388 “Waterfall” shots from “Arkansas” by looking at the number in the top of the third column, and additionally know that I used 5 different lenses to take them. I could further sort by more specific keywords by using the next column for another keyword search. You can create up to 8 columns at one time.
This will give you an idea of how the Library Filter works. By customizing the content of the columns and using multiple criteria you can perform very complex searches for your photos. You can also use of combination of the “Metadata”, “Text”, and “Attribute” modules by holding down the shift key and clicking on another module to expand the filter to show more information.

With a little practice this should make finding your photos a snap!
Great Places for Great Photos
Let me help you to find a great location for your next photography adventure. I will list many lesser-known destinations, as well as the famous "Icon Locations" for photography. I will provide photos (Lots of Photos), location information, consisting of what there is to photograph as well as other information about the destination. I will give costs, maps, directions, contact information, and other essential information for a successful photo trip. I will only post for locations that I have personally photographed to ensure a quality guide to great locations for photography. If you know of great places that are not posted, please send me the details, I may just decide that is a place I need to go!
 Greg Disch is a freelance photographer located in Arkansas. Greg specializes in nature, scenic, wildlife, and other outdoor subjects in Arkansas and other areas of the country. Most of the images on this site are available for sale as prints, personal use, or rights managed stock photos.
Greg offers both classroom instruction and in the field hands on photographic workshops. Classroom sessions are normally held in Fort Smith Arkansas, but arrangements can be made to bring a class to your group.
All classes and workshops have small class sizes designed to provide an optimum student to instructor ratio, where you can get the personal attention, you need. Most classes and workshops are limited to a maximum of six participants and will be held with a minimum of only two.
If you are looking for a wonderful opportunity to get personal individual instruction, I do private workshops and classes at a location of your choice, whether doing a location photo shoot, coming to your home or business, traveling across the country on a road trip, or at my classroom. This is a fantastic way to learn digital workflow and be sure that your computer equipment is properly configured for optimum performance.
Thank you so much. This article was exactly what I needed. So simple when explained the way you have done.
Thanks Robbie, I am glad that you have found the information usefull, like I said in the article Adobe did a great job of hiding the power and functionality of the filter bar.